Category:Arduino
Coding
Data Handler
| Function | Description | Category |
|---|---|---|
| strncpy | copy string or char array to string or char array | String and Char |
| stringOne += 12345678 | add to string | String and Char |
|
string to char array | String and Char |
Board Manager Links
| Name | Board | Link | |
|---|---|---|---|
| ESP8266 | ESP8266 | http://arduino.esp8266.com/stable/package_esp8266com_index.json | |
| Digispark | ATTINY85 Digispark | http://digistump.com/package_digistump_index.json | |
| ESP32 | ESP32 | ttps://github.com/espressif/arduino-esp32 | Need to install |
| Attinycore | Attiny | http://drazzy.com/package_drazzy.com_index.json | Not include ATTINY13 |
| Microcore | Attiny, attiny13 | https://mcudude.github.io/MicroCore/package_MCUdude_MicroCore_index.json | |
| DIY ATttiny | Attiny, attiny13 | https://raw.githubusercontent.com/sleemanj/optiboot/master/dists/package_gogo_diy_attiny_index.json | |
| Redbear | NRF51822 | https://redbearlab.github.io/arduino/package_redbearlab_index.json | |
| SAMD | SAMD | Official |
- For STM32, see on this page STM32
- Copy into preference, and install in board manager
- atmega 8 - minicore - https://github.com/MCUdude/MiniCore
Firmware
Use Arduino as ISP
There is sketch in the arduino IDE, for the wiring in the description should be:
| pin name | not-mega | mega(1280 and 2560) |
|---|---|---|
| SS(Slave Reset) | 10 | 53 |
| MOSI | 11 | 51 |
| MISO | 12 | 50 |
| SCK | 13 | 52 |
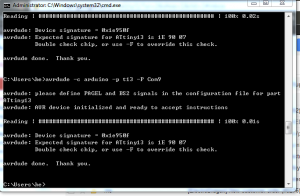
upload the sketch and use Avrdude to test it, and should success on following picture
Burning bootloader
- Tools you will need:
- USBASP programmer: in our test, it's much faster than the USBtinyISP, don't know really know why, burning with usbasp only need 5-10 seconds, but usbtinyisp need around 1-2 minutes
- ISP 10-6 Pins converter: It's really helpful to convert ISP 10 pins to ISP 6 pins, and also help you to remember the pins for ISP-6, because the silk print indicate it! Works for all the ISP-10 programmer.And Arduino only have 6-pin ISCP connector
- Your arduino board: The MCU is already on the board and need to be programmed.
- Connect the programmer with the converter like below, only need to remember MISO is always to PIN1:
- Connect the board with USBASP to your laptop and burn, no need USB connect to the board anymore
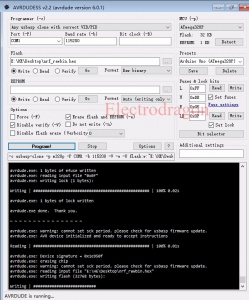
Burning bootloader with other programmer, directly via hex file
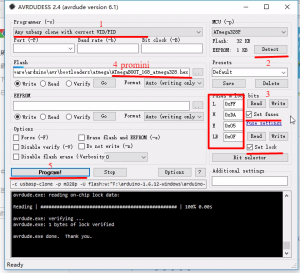
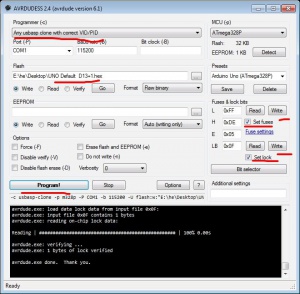
Use Avrdudess programming
You can find the avrdude we used here.programmer
Fuse bit
- Atmega328p UNO
hfuse - 0xDE
lfuse - 0xFF
efuse - 0x05
- Lock bit
- BLB12 BLB11 - app to bootloader
- BLB02 BLB01 - bootloader to app
- LB2 LB1 - visit control to Flash, EEPROM, Fuse (hfuse, lfuse, efuse) and Boot Lock Bit
- bootloader area NOT visit-able - lfuse set to 0x0F
- bootloader area visit-able - lfuse set to 0x3F
Deploy arduino
- complied code and find file for example named "nrf24duino_start.ino.with_bootloader.hex" in folder C:\Users\Administrator\AppData\Local\Temp\arduino_build_981353
- flash write into MCU
- pro mini fuse set, L:0xFF, H:0xDA, E:0xFD, LB:0x0F
Other type bootloader
- https://github.com/SpenceKonde/ATTinyCore
- https://github.com/damellis/attiny
- https://github.com/mikaelpatel/Cosa
- https://github.com/leomil72/megax8
- https://github.com/MCUdude/MicroCore
Specifications
Tips
Fix auto upload manually
- Hold down the reset button when IDE show "compile ..."
- Release the reset button when IDE show "uploading ..."
Extension
Documents
- STM32 Nucleo Toolchain use manual
- Eclipse extension with GCC toolchain
Documents
- See how to make minimal Arduino on this page DIY-arduino
- List of unofficial boards for arduino ide
Subcategories
This category has the following 4 subcategories, out of 4 total.
Pages in category "Arduino"
The following 9 pages are in this category, out of 9 total.


