Arduino-ESP8266
Install in Arduino IDE
Installation
- Install esp8266 firmware in arduino IDE - add to board manager - http://arduino.esp8266.com/stable/package_esp8266com_index.json
- Board file from here http://arduino.esp8266.com/stable/package_esp8266com_index.json
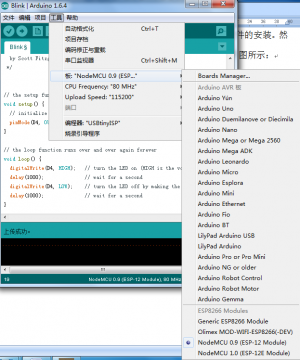
- Open Tools→Board:xxx→Boards Manager and install esp8266 by ESP8266 Community
Select Board
Supported Board - Choose correct board
- Adafruit HUZZAH ESP8266 (ESP-12)
- NodeMCU 0.9
- NodeMCU 1.0
- Olimex MOD-WIFI-ESP8266-DEV
- Olimex MOD-WIFI-ESP8266
- SparkFun ESP8266 Thing
- SweetPea ESP-210
- Generic ESP8266 modules
Upload Options
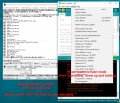
- Please see the guideline image on the right, this will be used in esp flash download tool, arduino IDE, etc
| Option | value for ESP-12F | Description |
|---|---|---|
| Boards | Generic ESP8266 Modules | - |
| flash mode | QIO or DIO | - |
| crystal frequency | 26mhz | - |
| flash frequency | 40mhz | - |
| CPU frequency | 80mhz | - |
| upload using | "serial" | - |
| flash size | 4MB / 32Mbit (3M SPIFSS) | Old 512Kbit |
| Debug mode / level | Disable / none | - |
| reset mode | none or nodemcu | - |
| upload speed | 115200 ~ 921600 | use highest normally |
| upload port | COM Port | - |
| lwip Variant | v2 lower memory | |
| Buildin LED | 2 | - |
| Erase Flash | Only Sketch |
Upload
- enter into bootloader mode of the board first
Code Examples
Default arduino sketch
- WifiScan - find close by wifi spot
- WifiClient - connect to wifi
- Wifiwebserver - build a simple web server
http://server_ip/gpio/0 - address to set gpio 2 to low
http://server_ip/gpio/1 - address to set gpio 2 to high
Other sketch - 1 - ESP8266-Arduino via serial, control GPIO
Other sketch - ESP8266-Arduino via serial, send TCP data
- Connect WIFI, Send Data
- In this case, the wifi module still connect to hardware serial (software serial port can not higher than 19200 baud rate), and another software serial port should be created on arduino and print out via another serial port
- So the connection should be
Wifi's uart to arduino hardware uart;
arduino's software UART to another serial port device, for example like FTDI basic, CP2102 breakout, etc, and this serial port device can connect to PC to read data
- change the SSID and password in code for your wifi router
- Demo code please see here.
Demo code - [[* More esp8266 arduino library, demo code find on our github|D1 Mini example code]]


