Stepper Drive SDK
Arduino Simple Demo Dode
Direct digital write - L9110, ULN2003
Code 1
Drive Board with DIR, STEP Pin (A3967, A4988)
- A3967
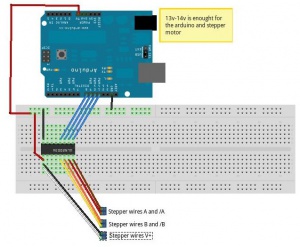
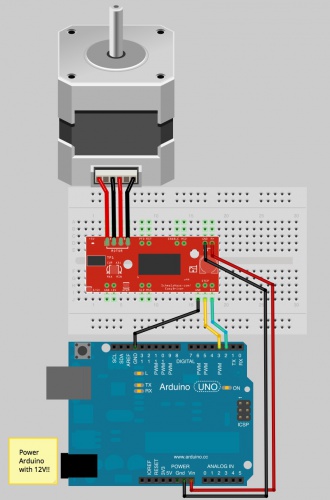
Once you have everything hooked up correctly, you can upload firmware to the Arduino. The following is some very simple example code to get you up and running. There are numerous examples online, as well as a Stepper library included with the Arduino IDE. Feel free to play around with this code, changing values to see what happens, and feel free to explore other code.
Demo Code 2
//simple A4988 connection
//jumper reset and sleep together
//connect  VDD to Arduino 3.3v or 5v
//connect  GND to Arduino GND (GND near VDD)
//connect  1A and 1B to stepper coil 1
//connect 2A and 2B to stepper coil 2
//connect VMOT to power source (9v battery + term)
//connect GRD to power source (9v battery - term)


int stp = 13;  //connect pin 13 to step
int dir = 12;  // connect pin 12 to dir
int a = 0;     //  gen counter

void setup()
{
  pinMode(stp, OUTPUT);
  pinMode(dir, OUTPUT);
}


void loop()
{
  if (a <  200)  //sweep 200 step in dir 1
   {
    a++;
    digitalWrite(stp, HIGH);
    delay(10);
    digitalWrite(stp, LOW);
    delay(10);
   }
  else
   {
    digitalWrite(dir, HIGH);
    a++;
    digitalWrite(stp, HIGH);
    delay(10);
    digitalWrite(stp, LOW);
    delay(10);

    if (a>400)    //sweep 200 in dir 2
     {
      a = 0;
      digitalWrite(dir, LOW);
     }
    }
}
Use accelstepper library
//This is an example of how you would control 1 stepper

#include <AccelStepper.h>

int motorSpeed = 600; //maximum steps per second (about 3rps / at 16 microsteps)
int motorAccel = 10000; //steps/second/second to accelerate

int motorDirPin = 2; //digital pin 2
int motorStepPin = 3; //digital pin 3

//set up the accelStepper intance
//the "1" tells it we are using a driver
AccelStepper stepper(1, motorStepPin, motorDirPin);


void setup(){
 stepper.setMaxSpeed(motorSpeed);
 stepper.setSpeed(motorSpeed);
 stepper.setAcceleration(motorAccel);

 stepper.moveTo(320); //move 32000 steps (should be 10 rev)
}

void loop(){

 //if stepper is at desired location
 if (stepper.distanceToGo() == 0){
  //go the other way the same amount of steps
  //so if current position is 400 steps out, go position -400
  stepper.moveTo(-stepper.currentPosition());
 }


 //these must be called as often as possible to ensure smooth operation
 //any delay will cause jerky motion
 stepper.run();
}
Stepper library
The Arduino programming environment comes with a function library for controlling a stepper motor. To use the library, in the Arduino Editor from the top menu bar: Sketch > Import Library > Stepper. Copy the example code below into an Arduino program.
Arduino Example Code Notes :
- The example code assumes that the stepper is being controlled by Arduino pins 8, 9, 10 and 11, but you can use any set of four pins.
- The "#define STEPS 100" line defines the number of steps per rev. A 3.75 deg motor has 96 steps/rev while a 7.2 deg motor has 48 steps/rev.
- The "Stepper stepper(STEPS, 8, 9, 10, 11)" line is where you enter the four pins used to control the stepper.
- The "stepper.setSpeed(x)" command sets the motor speed to x rpm.
- The "stepper.step(x)" command turns the motor x steps at the speed last set in the stepper.setSpeed() command. The motor turns one direction for postive x and the reverse direction for negative x.

