RPI RMP HDK
Quick Setup
- You can leave the RTC and battery for beginning, it not necessary to drive the RGB matrix panel.
- Switch can turn to P3 chain side to enable P3 HUB75 output.
- To drive one panel, connect P1 Port to your panel HUB "IN"
- Supply Power at least 3-5A 5V to LED panel.
- Double check your panel specifications, we only support for our type panels. Different panel specification may need revise the code.
Board schematic, Functions
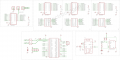
Board schematic
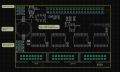
Board Pin Definitions


- To use RTC DS1307, please don't forget to turn on IIC interface in "raspi-config", and switch turn to up.
- IIC interface can leave on if not used P3, when you only use P2 and P3
- Notice more about the customize version issue before ordering - https://github.com/hzeller/rpi-rgb-led-matrix/issues/797