ESP8266 IoT
AI-Thinker AI-Link
- make sure you are using at least 1.2 version AT firmware (run cloud update first)
- Turn on the APP "AI-link" in your android cell phone
- enter the wifi SSID and password and click "start"
- set on module
- set mode AT+CWMODE=1
- run command on the module to start
AT+CWSMARTSTART=0
- now the serial monitor will show up the wifi SSID and password info and automatically connect it.
OK
SMART SUCCESS
SSID:TP-LINK_4226
PASSWORD:1234567890
- Try to make a ping test
AT+PING="www.baidu.com"
+42
OK
Espressif ESP-Touch
- make sure you are using at least 1.2 version AT firmware (run cloud update first)
- Turn on the APP "smarthome" in your android cell phone
- click "smartlink" and enter wifi details then connect
- Set on module
- AT+CWMODE=1
OK
- AT+CWSMARTSTART=1 // using mode 2, slower
OK
WIFI DISCONNECT
SMART SUCCESS
SSID:TP-LINK_4226
PASSWORD:1234567890
OK
WIFI CONNECTED
WIFI GOT IP
- Try to make a ping test
AT+PING="www.baidu.com"
+42
OK
Wechat Air-Kiss
Smartlink mode
- AT + CWSMARTSTART = 0 AI-LINK intelligent connections advantages: fast, the router is compatible with the best available in the phone is not connected to the case under the Wi-Fi configuration. Cons: Wi-Fi will cause the phone offline. Principle and current connection socket using the same small k.
- AT + CWSMARTSTART = 1 ESP-TOUCH intelligent connection Advantages: Wi-Fi will not disconnect the phone Disadvantages: slow, very few router may have compatibility issues.
- AT + CWSMARTSTART = 2 Airkiss intelligent connections advantages: support micro-channel hardware platform. Cons: Almost not own designs APP calls.
Lan service
- AT+LANSTART
Cloud Send
- AT+CIFSR make sure connect to internet
- AT+CIPSTART="UDP","iot.ai-thinker.com",5001
- AT+CLDSTART // cloud send start
- AT+CLDSTOP // cloud send stop
- AT+CIPMODE=1
- AT+CIPSEND
- {"type":"signin","name":"ai-thinker","password":"12345"}
- {"type":"connect","from*:*ai-thinker","to*:*anyone","password*:*anyonePassword"}
- {"type":"disconnect"}
- {"type":"signout","name":"ai-thinker","password":"12345"}
Reference link
ESP Cloud Data
NodeMCU w/relayr
- https://github.com/sheenhx/esp8266/tree/master/DHT22%20temperature
- SDK: https://developer.relayr.io/documents/Welcome/Introduction
Data Logging Platform
- https://thingspeak.com
- https://www.particle.io/prototype#cloud
- https://data.sparkfun.com/
- https://thinger.io/
MQTT
Cloudmqtt with NodeMCU
- https://www.cloudmqtt.com/docs-nodemcu.html
- Reference example code at https://github.com/nodemcu/nodemcu-firmware/blob/master/lua_examples/mqtt/mqtt2cloud.lua
- API page: https://github.com/nodemcu/nodemcu-firmware/wiki/nodemcu_api_en
Cloudmqtt setup
m=mqtt.Client("nodemcu1",60,"swqzxzhr","9JMcxVeUNz3t")
m:connect("m11.cloudmqtt.com",19311,0,1)
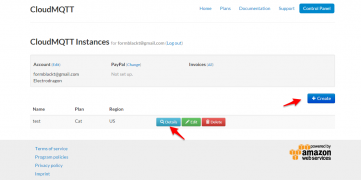
Register and create instance
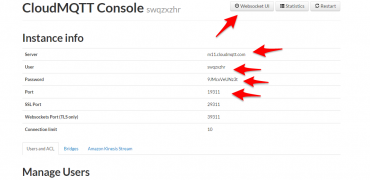
remember to use server, use, password, port info, and click websocket gui to monitor
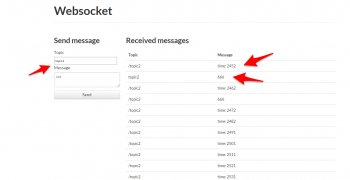
enter into websocket to monitor, send and receive data
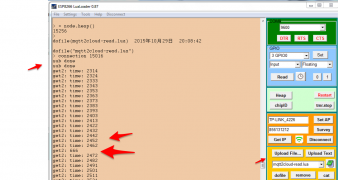
Check on NodeMCU end


Modified example code
-- test with cloudmqtt.com
m_dis={}

function dispatch(m,t,pl)
	if pl~=nil and m_dis[t] then
		m_dis[t](m,pl)
	end
end

function topic1func(m,pl)
	print("get1: "..pl)
end

function topic2func(m,pl)
	print("get2: "..pl)
end

m_dis["/topic1"]=topic1func
m_dis["/topic2"]=topic2func

-- Lua: mqtt.Client(clientid, keepalive, user, pass)
m=mqtt.Client("nodemcu1",60,"swqzxzhr","9JMcxVeUNz3t")

-- Lua: mqtt:connect( host, port, secure, auto_reconnect, function(client) )
m:connect("m11.cloudmqtt.com",19311,0,1)

-- ON callback event "connect", subscribe to topic and start the first publish
m:on("connect",function(m)
	print("connection "..node.heap())
	m:subscribe("/topic1",0,function(m) print("sub done") end)
	m:subscribe("/topic2",0,function(m) print("sub done") end)
	m:publish("/topic1","hello112",0,0) m:publish("/topic2","world211",0,0)
	end )

-- ON callback event "offline"
m:on("offline", function(conn)
    print("disconnect to broker...")
    print(node.heap())
end)

-- ON callback event "message", and print on NodeMCU monitor
m:on("message",dispatch )

-- intervally publish the time
tmr.alarm(0,10000,1,function() local pl = "time: "..tmr.time()
	m:publish("/topic2",pl,0,0)
	end)
More reference
- test.mosquitto.org