Arduino sketch on pcduino
Setup (one time)
Install the Git (not necessary for new version of ubuntu)
If not already done, set up git. Do this using the command:
ubuntu@ubuntu:~$ sudo apt-get install git
Make sure you’re in your home folder by typing
ubuntu@ubuntu:~$ cd
ubuntu@ubuntu:~$ pwd
and see
/home/Ubuntu
Now download the distribution
Typing
ubuntu@ubuntu:~$ git clone https://github.com/pcduino/c_enviroment
And will see
Cloning into 'c_enviroment'...
remote: Counting objects: 250, done.
remote: Compressing objects: 100% (166/166), done.
remote: Total 250 (delta 87), reused 232 (delta 69)
Receiving objects: 100% (250/250), 302.59 KiB | 78 KiB/s, done.
'Resolving deltas: 100% (87/87), done.
You should now have a folder called c_enviroment. You can check by typing ls
ubuntu@ubuntu:~$ ls
And you will see
Desktop Documents Downloads Music Pictures Public Templates Videos arduino c_enviroment sample
Initial look around
Change into the c_envoroment folder
ubuntu@ubuntu:~$ cd c_enviroment
ubuntu@ubuntu:~/c_enviroment$ ls
Make to complie
Now run make to make the libraries and the examples with the following command
ubuntu@ubuntu:~/c_enviroment$ make
You should see a series of compile commands occurring without errors with the last line being:
make[1]: Leaving directory `/home/ubuntu/c_enviroment/sample'
View executable files after make at c_environment/output/test
They are basically two folders, sample and subfolder test
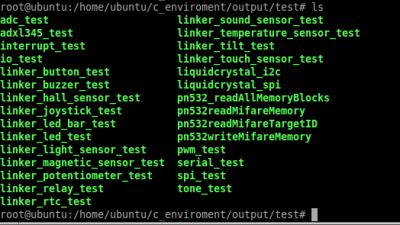
The resulting binary files are found in the output/test folder
ubuntu@ubuntu:~/c_enviroment$ cd output/test
ubuntu@ubuntu:~/c_enviroment/output/test$ ll
and will see
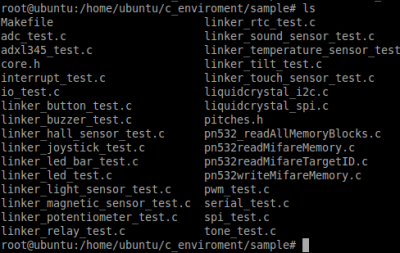
View source .c sketch files list at c_environment/sample
The source for each one is in sample folder

View .c Source Sketch
To view the contents of a sample sketch, (this example we’ll look at the contents of linker_led_test.c) type:
ubuntu@ubuntu:~/c_enviroment/sample$ cat linker_led_test.c
And will see:
/*
* LED test program
*/
#include <core.h>
int led_pin = 1;

void setup()
{
if(argc != 2){
goto _help;
}
led_pin = atoi(argv[1]);
if((led_pin < 0) || (led_pin > 13)){
goto _help;
}
pinMode(led_pin, OUTPUT);
return;

_help:
printf("Usage %s LED_PIN_NUM(0-13)n", argv[0]);
exit(-1);
}
void loop()
{
digitalWrite(led_pin, HIGH); // set the LED on
delay(1000); // wait for a second
digitalWrite(led_pin, LOW); // set the LED off
delay(1000); // wait for a second
}
Editing an existing sketch
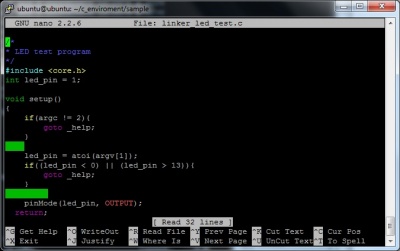
You will probably want to change some of these samples as an initial play so will need a text editor. We tend to use nano Editor, but you may already have a favourite. Let’s use the same sketch as the example, type:
ubuntu@ubuntu:~/c_enviroment/sample$ nano linker_led_test.c
You should see something like:
Creating your own sketch
Now lets create our own sketch and work out how to compile it so it runs. It will be a button on pin 7 that when pressed, turns on an LED on pin 8.
While in the sample folder, type:
ubuntu@ubuntu:~/c_enviroment/sample$ nano button_led.c
An empty nano screen should appear.
Copy and paste the following code into it. (Remember to paste in nano at the cursor, just right click the mouse button).
#include <core.h> // Required first line to run on pcDuino
int ledPin = 8;
int buttonPin = 7;
// variables will change:
int buttonState = 0; // variable for reading the pushbutton status

void setup() {
// initialize the LED pin as an output:
pinMode(ledPin, OUTPUT);
// initialize the pushbutton pin as an input:
pinMode(buttonPin, INPUT);
}

void loop(){
// read the state of the pushbutton value:
buttonState = digitalRead(buttonPin);

// check if the pushbutton is pressed.
// if it is, the buttonState is HIGH:
if (buttonState == HIGH) {
// turn LED on:
digitalWrite(ledPin, HIGH);
}
else {
// turn LED off:
digitalWrite(ledPin, LOW);
}
}
Above sketch modified from http://arduino.cc/en/tutorial/button
Modify the Makefile and compile
Now we need to add this new sketch to the Makefile in the samples folder. Open the Makefile with nano (or your favourite text editor)
ubuntu@ubuntu:~/c_enviroment/sample$ nano Makefile
You will see a section that lists all the OBJS something like:
OBJS = io_test adc_test pwm_test spi_test adxl345_test serial_test liquidcrystal_i2c liquidcrystal_spi interrupt_test tone_test
OBJS += linker_led_test linker_potentiometer_test linker_tilt_test linker_light_sensor_test linker_button_test
OBJS += linker_touch_sensor_test linker_magnetic_sensor_test linker_temperature_sensor_test linker_joystick_test
OBJS += linker_rtc_test linker_sound_sensor_test linker_buzzer_test linker_hall_sensor_test linker_led_bar_test linker_relay_test
OBJS += pn532_readAllMemoryBlocks pn532readMifareMemory pn532readMifareTargetID pn532writeMifareMemory
We’re going to add a line to the end of this with the name of the scketch we just created:
OBJS += button_led
Note, we don’t put the .c on the end.
Save the file and exit nano using <CTRL>X with a y and <enter>
We now run make by typing
ubuntu@ubuntu:~/c_enviroment/sample$ make
You should see a whole bunch of text with the end being:
button_led.c -o ../output/test/button_led ../libarduino.a
If all went well, you can go to the output/test folder and find your executable you have created:
ubuntu@ubuntu:~/c_enviroment/sample$ cd ../output/test/
ubuntu@ubuntu:~/c_enviroment/output/test$ ll
and will see:
total 676
drwxrwxr-x 2 ubuntu ubuntu 4096 Apr 27 07:51 ./
drwxrwxr-x 3 ubuntu ubuntu 4096 Apr 27 06:49 ../
-rwxrwxr-x 1 ubuntu ubuntu 13868 Apr 27 07:51 adc_test*
-rwxrwxr-x 1 ubuntu ubuntu 28284 Apr 27 07:51 adxl345_test*
-rwxrwxr-x 1 ubuntu ubuntu 13668 Apr 27 07:51 button_led*
…..(not showing rest of listing here)
Run your sketch
To run it, once you have wired up a switch and led to the right pins, type:
ubuntu@ubuntu:~/c_enviroment/output/test$ ./button_led
To stop the program, <Ctrl>C
A quick re-cap
Add #include <core.h> to the top of your sketch.
Create your sketch in the samples folder (if your familiar with linux, makefiles, and compiling code, you could set up your own)
Add the filename to the Makefile in the samples folder in the OBJS section without the .c
Run make
Run the executable from the output/test folder.
You can introduce command line arguments into your sketch to make it more transportable.

