ESP8266 IoT Firmware
The following examples based on IoT demo, another example located in SDK examples subfolder, similar to AT demo, but run in a different/advanced way, and it can cooperate with website, devices/phone app, etc in a better way (curl), without additional MCU control.
Basic function GPIO(relay) control, PWM control (light), sensor (coming soon), lightweight webserver are set in the demo.
Customizing the IoT demo code to start the secondary development of your little module!
Update
- 12/02 Basic setup, json command usage, code about UART output string, os_timer
- 01/05 add DHT11 demo code
Setup
- To use the IoT demo, you must already know how to use Lubuntu environment to compile to the application code, our cygwin environment can not correctly compile for now. Also can successfully flash your module.
Change wired password
- Change the password setup in user_esp_platform.c (comment the line of os_sprintf, and add new one instead)and change password at user_config.h (#define PASSWORD "v*%W>L<@i&Nxe!")
#ifdef SOFTAP_ENCRYPT
struct softap_config config;
char password[33];
char macaddr[6];

wifi_softap_get_config(&config);
wifi_get_macaddr(SOFTAP_IF, macaddr);

os_memset(config.password, 0, sizeof(config.password));
// os_sprintf(password, MACSTR "_%s", MAC2STR(macaddr), PASSWORD);
os_sprintf(password, "%s", PASSWORD); // or os_sprintf(password, "12345678"); to set it directly to 12345678
os_memcpy(config.password, password, os_strlen(password));
config.authmode = AUTH_WPA_WPA2_PSK; // can also set this to AUTH_OPEN or others (OPEN、WPAPSK、WPA2PSK、WPAPSK/WPA2PSK)

wifi_softap_set_config(&config);
#endif
Check
- Default module work at softAP, 192.168.4.1
- Now you can use curl to set the module (can used by android, python, etc), if you are using curl in windows, you should also notice about this issue Curl
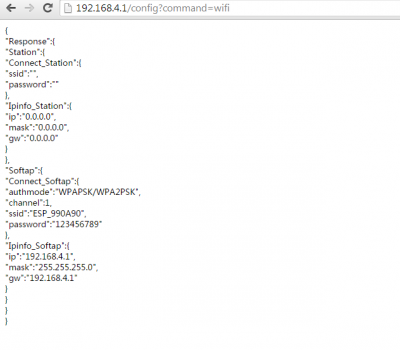
- Check the wifi settings on browser with following URL: http://192.168.4.1/config?command=wifi
Curl Command
Tool can find at http://curl.haxx.se/download.html, the word ip should be replaced to 192.168.4.1 which is the wifi IP
- Check version
curl -X GET http://ip/client?command=info
- Set station mode
curl -X POST -H Content-Type:application/json -d '{"Request":{"Station":{"Connect_Station":{"ssid":"tenda","password":"1234567890","token": "1234567890123456789012345678901234567890"}}}}' http://ip/config?command=wifi
- Set SoftAP mode
curl -X POST -H Content-Type:application/json -d '{"Request":{"Softap":{"Connect_Softap":{"authmode":"OPEN","channel":6,"ssid":"ESP_IOT_SOFTAP","password":""}}}}' http://192.168.4.1/config?command=wifi
Find device in Ethernet
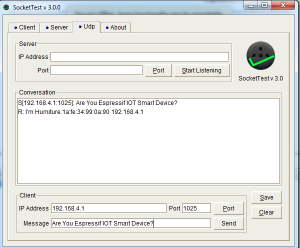
- Send the following string by UDP to device 192.168.4.1 at port 1025, will receive (care the empty space below, and don't chat with it :) )
- For the pins set please see on wi07c page
Are You Espressif IOT Smart Device?
Plug
I’m Plug.xx:xx:xx:xx:xx:xxyyy.yyy.yyy.yyy
Light
I’m Light.xx:xx:xx:xx:xx:xxyyy.yyy.yyy.yyy
Sensor
I’m Humiture.xx:xx:xx:xx:xx:xxyyy.yyy.yyy.yyy
xx:xx:xx:xx:xx:xx is mad addr, and yyy.yyy.yyy.yyy is IP addr
Devices
Devices set at user_config.h
#if ESP_PLATFORM
#define PLUG_DEVICE             0
#define LIGHT_DEVICE            0
#define SENSOR_DEVICE			1
Demo
- We use light a example here, data post via chrome plugin called postman, you can also use curl command line
- Select Json, URL = http://192.168.4.1/config?command=light, use raw data {"freq":120,"rgb":{"red":111,"green":222,"blue":119}}
- Now you open open the URL directly to see the change
Plug
Get plug status
curl -X GET http://ip/config?command=switch
Set plug status
curl -X POST -H Content-Type:application/json -d '{"Response":{"status":1}}' http://ip/config?command=switch
Light
Get status
curl -X GET http://ip/config?command=light
Set status
curl -X POST -H Content-Type:application/json -d '{"freq":100,"rgb":{"red":200,"green":0,"blue":0}}' http://ip/config?command=light
Frequency 0-500, RGB in 255 range
Sensor N/A yet
NA
Code Customize
Basic Timer and Uart output
The following code will set the module to output text string every one second.
- Set extra UART string output void in uart.c, this is based on current uart tx output void uart0_tx_buffer(uint8 *buf, uint16 len)
void Uart0_Send_Str(uint8 *buf)
{
	while(*buf!='\0'){
		uart0_tx_buffer(buf, 1);
		buf++;
		}
}
- Add header in uart.h
void uart0_send_str(uint8 *buf);
- Add include in main.c
#include "driver/uart.h" // uart output
#include "osapi.h" // timer
#include "os_type.h" // timer
- Also some extra definition at the beginning:
os_timer_t mytimer;

//void uart0_send_str(uint8 *buf); //not necessary line

Send_str(void) // define timer function
{
	uart0_send_str("\r\n Electrodragon \r\n");
}
- in the void user_init (application entry)
uart_init(BIT_RATE_115200,BIT_RATE_115200); // start the UART

os_timer_disarm(&mytimer); // dis_arm the timer
os_timer_setfn(&mytimer, (os_timer_func_t *)Send_str, NULL); // set the timer function, dot get os_timer_func_t to force function convert
os_timer_arm(&mytimer, 1000, 1); // arm the timer, 1000 repeat, repeat always
GPIO Control
- Reference code in IoT is user_plug.c
- GPIO16 will be used alone as gpio16.h
- Set Pin function PIN_FUNC_SELECT(PIN_NAME, FUNC), pi name refer to eagle_soc.h, func for example FUNC_GPIO13
- GPIO_OUTPUT_SET(gpio_no, bit_value) set gpio_no output bit_value (more simple than gpio_output_set)
- Basic example
void My_LED_Init(void)
{
    // config GPIO12 13 14 16 as normal GPIO
 	PIN_FUNC_SELECT(PERIPHS_IO_MUX_MTDI_U,FUNC_GPIO12);
 	PIN_FUNC_SELECT(PERIPHS_IO_MUX_MTDI_U,FUNC_GPIO15);
	PIN_FUNC_SELECT(PERIPHS_IO_MUX_MTDI_U,FUNC_GPIO13);
	PIN_FUNC_SELECT(PERIPHS_IO_MUX_MTDI_U,FUNC_GPIO14);
       GPIO_OUTPUT_SET(GPIO_ID_PIN(12), 0);
	GPIO_OUTPUT_SET(GPIO_ID_PIN(13), 0);// default low
	GPIO_OUTPUT_SET(GPIO_ID_PIN(14), 0);
	GPIO_OUTPUT_SET(GPIO_ID_PIN(15), 0);

}
ADC (DHT11)
- Demo code for DHT11 can be found at this link
- Add code files to app/user, and replace the code entry file user_main.c, will work
PWM control
- pwm_init void (see page 61 at SDK docs)
- inlclude header file /driver/pwm.h in user main.c
#define PWM_0_OUT_IO_MUX PERIPHS_IO_MUX_MTDI_U
#define PWM_0_OUT_IO_NUM 12
#define PWM_0_OUT_IO_FUNC  FUNC_GPIO12

#define PWM_1_OUT_IO_MUX PERIPHS_IO_MUX_MTDO_U
#define PWM_1_OUT_IO_NUM 15
#define PWM_1_OUT_IO_FUNC  FUNC_GPIO15

#define PWM_2_OUT_IO_MUX PERIPHS_IO_MUX_MTCK_U
#define PWM_2_OUT_IO_NUM 13
#define PWM_2_OUT_IO_FUNC  FUNC_GPIO13
- Demo code
unit8 PWM_CH[]= (0, 0, 0);
unit16 freq = 1000;

pwm_init(freq, PWM_CH[]);

while(1)
{
pwm_set_duty(PWM_CH[2], 0);
pwm_start();
PWM_CH[2]+=1;
if(PWM_CH[2]>99)
   PWM_CH[2] =0;
delay_ms(80);
}
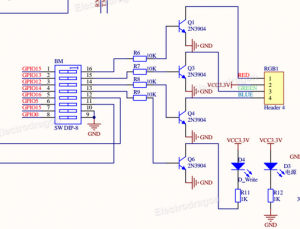
- Hardware can use a 4 pins PWM DIP LEDs from our store
- Hardware wiring:
Sample code R1
The task of this sample code
- The board ESP-01 must switch to STA (Wi-Fi client) to connect to our AP.
- Once the connection to the AP, you must install TCP-connection to the PC and send the test string.
- GPIO0 connect button for the closure send a text string.
- The procedure of sending repeated every 5 seconds.
Open the file user \ user_main.c The basic procedure, which is performed at the start of the firmware is
//Init function
void ICACHE_FLASH_ATTR
user_init()
{
}
In the beginning of the file user \ user_main.c add header files:
#include "ets_sys.h"
#include "osapi.h"
#include "os_type.h"
#include "user_interface.h"
#include "driver/uart.h"
#include "espconn.h"
#include "mem.h"
#include "gpio.h"
#include "user_config.h"
Data files, except user_config.h and driver / uart.h are C: \ Espressif \ ESP8266_SDK \ include \
- ets_sys.h - particular IP structure and determination to work with events and timers
- osapi.h - timers and some system functions such os_strcat, os_memcpy, os_delay_us etc.
- os_type.h - mapinga structures of ets_sys.h
- user_interface.h - a lot of support structures and procedures API, in particular for working with wi-fi, procedures system_restart, system_deep_sleep etc.
- espconn.h - the main file API with structures and procedures for working with TCP and UDP connections
- mem.h - work with memory, os_malloc, os_free etc.
- gpio.h - support structures and procedures API to work with GPIO
   // Start UART at 115200
    uart_init(BIT_RATE_115200, BIT_RATE_115200);
    // Wait for 100 ms.
    os_delay_us(100);
    #ifdef PLATFORM_DEBUG
    // Display the string at the beginning of uart run. See definition in PLATFORM_DEBUG user_config.h
    uart0_sendStr("ESP8266 platform starting...\r\n");
    #endif
    // Structure with information about the configuration of STA (in client mode AP)
    struct station_config stationConfig;
    char info[150];
    // Check if the board was not in client mode AP, then translate it in this mode
    // In the SDK version 0.9.2 below after wifi_set_opmode had to do system_restart
    if(wifi_get_opmode() != STATION_MODE)
    {
        #ifdef PLATFORM_DEBUG
        uart0_sendStr("ESP8266 not in STATION mode, restarting in STATION mode...\r\n");
        #endif
        wifi_set_opmode(STATION_MODE);
    }
// If the card mode STA, then set the configuration, the name of AP, password, see User_config.h
// Optional read the MAC address of our card mode AP, see. Wifi_get_macaddr (SOFTAP_IF, macaddr)
// In the STA in charge will be a different MAC address as the client, but we have to address yourself to read that she had if she had acted as an access point
    if(wifi_get_opmode() == STATION_MODE)
    {
        wifi_station_get_config(&stationConfig);
        os_memset(stationConfig.ssid, 0, sizeof(stationConfig.ssid));
        os_memset(stationConfig.password, 0, sizeof(stationConfig.password));
        os_sprintf(stationConfig.ssid, "%s", WIFI_CLIENTSSID);
        os_sprintf(stationConfig.password, "%s", WIFI_CLIENTPASSWORD);
        wifi_station_set_config(&stationConfig);
        wifi_get_macaddr(SOFTAP_IF, macaddr);
    }
    // For adjusting the output data in uart mode setup STA
    #ifdef PLATFORM_DEBUG
    if(wifi_get_opmode() == STATION_MODE)
    {
        wifi_station_get_config(&stationConfig);
        os_sprintf(info,"OPMODE: %u, SSID: %s, PASSWORD: %s\r\n",
            wifi_get_opmode(),
            stationConfig.ssid,
            stationConfig.password);
        uart0_sendStr(info);
    }
    #endif
     // Start the timer test the connection to Wi-Fi, check the connection every 1 sec., If the connection is established, then run TCP-client and send a test string.
    os_timer_disarm(&WiFiLinker);
    os_timer_setfn(&WiFiLinker, (os_timer_func_t *)wifi_check_ip, NULL);
    os_timer_arm(&WiFiLinker, 1000, 0);
    // Initialize GPIO,
    BtnInit();
     // Display a message about the successful launch
    #ifdef PLATFORM_DEBUG
    uart0_sendStr("ESP8266 platform started!\r\n");
    #endif
- GPIO initialization procedure
void BtnInit() {
    PIN_FUNC_SELECT(PERIPHS_IO_MUX_GPIO0_U, FUNC_GPIO0);
     // Turn off the pull-up resistor - (pull down)
    PIN_PULLDWN_DIS(PERIPHS_IO_MUX_GPIO0_U);
     // Turn on the pull-up resistor + (pull up)
    PIN_PULLUP_EN(PERIPHS_IO_MUX_GPIO0_U);
     // Translate to enter GPIO0
    gpio_output_set(0, 0, 0, BIT0);
     // Start the timer, GPIO test
    os_timer_disarm(&BtnTimer);
    os_timer_setfn(&BtnTimer, BtnTimerCb, NULL);
    os_timer_arm(&BtnTimer, 500, 1);
}
Verification
The verification procedure is done on the forehead, without any elimination of contact bounce, the mind needs to be done differently, just as will be seen below, that does not go senddata no verification at raising interface wi-fi, that should also be taken into account.
- The verification procedure GPIO
static void ICACHE_FLASH_ATTR BtnTimerCb(void *arg)
{
    if (!GPIO_INPUT_GET(BTNGPIO))
    {
        GPIO_Time_Active++;
    } else {
        if (GPIO_Time_Active != 0)
        {
            #ifdef PLATFORM_DEBUG
            uart0_sendStr("Start sending data...\r\n");
            #endif
            // Отправляем данные
            senddata();
        }
        GPIO_Time_Active = 0;
    }
}
- The verification procedure Wi-Fi connection (called a timer)
static void ICACHE_FLASH_ATTR wifi_check_ip(void *arg)
{
     // Structure with information about, ip address of the client STA, subnet mask, gateway.
    struct ip_info ipConfig;
     // Disable the timer check wi-fi
    os_timer_disarm(&WiFiLinker);
     // Get information about network settings
    wifi_get_ip_info(STATION_IF, &ipConfig);
     // Check the status of wi-fi connection and the fact of the ip address
    if (wifi_station_get_connect_status() == STATION_GOT_IP && ipConfig.ip.addr != 0)
    {
         // The compounds of the wi-fi set
        connState = WIFI_CONNECTED;
        #ifdef PLATFORM_DEBUG
            uart0_sendStr("WiFi connected\r\n");
        #endif
        #ifdef PLATFORM_DEBUG
            uart0_sendStr("Start TCP connecting...\r\n");
        #endif
        connState = TCP_CONNECTING;
         // Send data to the PC
        senddata();
         // Start the timer test the connection and send the data already every 5 seconds, see. Teh.zadanie
        os_timer_setfn(&WiFiLinker, (os_timer_func_t *)wifi_check_ip, NULL);
        os_timer_arm(&WiFiLinker, 5000, 0);
    }
    else
    {
         // Wrong password
        if(wifi_station_get_connect_status() == STATION_WRONG_PASSWORD)
        {
            connState = WIFI_CONNECTING_ERROR;
            #ifdef PLATFORM_DEBUG
            uart0_sendStr("WiFi connecting error, wrong password\r\n");
            #endif
            os_timer_setfn(&WiFiLinker, (os_timer_func_t *)wifi_check_ip, NULL);
            os_timer_arm(&WiFiLinker, 1000, 0);
        }
         // AP found
        else if(wifi_station_get_connect_status() == STATION_NO_AP_FOUND)
        {
            connState = WIFI_CONNECTING_ERROR;
            #ifdef PLATFORM_DEBUG
            uart0_sendStr("WiFi connecting error, ap not found\r\n");
            #endif
            os_timer_setfn(&WiFiLinker, (os_timer_func_t *)wifi_check_ip, NULL);
            os_timer_arm(&WiFiLinker, 1000, 0);
        }
         // Error connecting to AP
        else if(wifi_station_get_connect_status() == STATION_CONNECT_FAIL)
        {
            connState = WIFI_CONNECTING_ERROR;
            #ifdef PLATFORM_DEBUG
            uart0_sendStr("WiFi connecting fail\r\n");
            #endif
            os_timer_setfn(&WiFiLinker, (os_timer_func_t *)wifi_check_ip, NULL);
            os_timer_arm(&WiFiLinker, 1000, 0);
        }
         // Other error
        else
        {
            os_timer_setfn(&WiFiLinker, (os_timer_func_t *)wifi_check_ip, NULL);
            os_timer_arm(&WiFiLinker, 1000, 0);
            connState = WIFI_CONNECTING;
            #ifdef PLATFORM_DEBUG
            uart0_sendStr("WiFi connecting...\r\n");
            #endif
        }
    }
}
- The procedure for sending data to the PC
static void ICACHE_FLASH_ATTR
senddata()
{
    char info[150];
    char tcpserverip[15];
    struct espconn *pCon = (struct espconn *)os_zalloc(sizeof(struct espconn));
    if (pCon == NULL)
    {
        #ifdef PLATFORM_DEBUG
        uart0_sendStr("TCP connect failed\r\n");
        #endif
        return;
    }
    pCon->type = ESPCONN_TCP;
    pCon->state = ESPCONN_NONE;
     // Set address TCP-based server where the data will be send
    os_sprintf(tcpserverip, "%s", TCPSERVERIP);
    uint32_t ip = ipaddr_addr(tcpserverip);
    pCon->proto.tcp = (esp_tcp *)os_zalloc(sizeof(esp_tcp));
    pCon->proto.tcp->local_port = espconn_port();
     // Set the port TCP-based server, which will send data
    pCon->proto.tcp->remote_port = TCPSERVERPORT;
    os_memcpy(pCon->proto.tcp->remote_ip, &ip, 4);
     // Register the callback function to be called when the connection is established
     espconn_regist_connectcb (pCon, at_tcpclient_connect_cb);
     // You can register a callback function to be called when rekonekte, but we do not need it yet
     // espconn_regist_reconcb (pCon, at_tcpclient_recon_cb);
     // Display debugging information
    #ifdef PLATFORM_DEBUG
    os_sprintf(info,"Start espconn_connect to " IPSTR ":%d\r\n",
           IP2STR(pCon->proto.tcp->remote_ip),
           pCon->proto.tcp->remote_port);
    uart0_sendStr(info);
    #endif
     // Connect to the TCP-server
    espconn_connect(pCon);
}
- callback function that is called after the connection
static void ICACHE_FLASH_ATTR
at_tcpclient_connect_cb(void *arg)
{
    struct espconn *pespconn = (struct espconn *)arg;
    #ifdef PLATFORM_DEBUG
    uart0_sendStr("TCP client connect\r\n");
    #endif
     // Callback function that is called after sending data
    espconn_regist_sentcb(pespconn, at_tcpclient_sent_cb);
     // Callback function that is called after disconnection
    espconn_regist_disconcb(pespconn, at_tcpclient_discon_cb);
    char payload[128];
     // Prepare the data string will send the MAC address of ESP8266 in AP mode and add the line ESP8266
    os_sprintf(payload, MACSTR ",%s\r\n", MAC2STR(macaddr), "ESP8266");
    #ifdef PLATFORM_DEBUG
    uart0_sendStr(payload);
    #endif
     // Send data
    espconn_sent(pespconn, payload, strlen(payload));
}
- callback functions called after sending data when power is removed
static void ICACHE_FLASH_ATTR
at_tcpclient_sent_cb(void *arg) {
    #ifdef PLATFORM_DEBUG
    uart0_sendStr("Send callback\r\n");
    #endif
     // The data sent, disconnected from the TCP-server
    struct espconn *pespconn = (struct espconn *)arg;
    espconn_disconnect(pespconn);
}

static void ICACHE_FLASH_ATTR
at_tcpclient_discon_cb(void *arg) {
    struct espconn *pespconn = (struct espconn *)arg;
     // Disable, frees up memory
    os_free(pespconn->proto.tcp);
    os_free(pespconn);
    #ifdef PLATFORM_DEBUG
    uart0_sendStr("Disconnect callback\r\n");
    #endif
}
Reference
- Code reading tool source insight
- Environment virtualbox


