PHP Config
PHP
- Edit sources.list due to licensing issues
- /etc/apt/sources.list -> add contrib non-free at end of each line
...
deb http://mirrors.digitalocean.com/debian jessie main contrib non-free
deb-src http://mirrors.digitalocean.com/debian jessie main contrib non-free

deb http://security.debian.org/ jessie/updates main contrib non-free
deb-src http://security.debian.org/ jessie/updates main contrib non-free

# jessie-updates, previously known as 'volatile'
deb http://mirrors.digitalocean.com/debian jessie-updates main contrib non-free
deb-src http://mirrors.digitalocean.com/debian jessie-updates main contrib non-free
PHP Debug
- Debug -> vim /etc/php5/fpm/pool.d/www.confMake necessary changes to match following values:
slowlog = /var/log/php5/slow.log
request_slowlog_timeout = 10s
PHP Configure (New1)
- Enable PHP in default config
   location ~ \.php$ {
       include snippets/fastcgi-php.conf;
       fastcgi_pass unix:/var/run/php5-fpm.sock;
   }
PHP Configure (New2)
use this latest config
- File at /etc/nginx/sites-available/default
- For PHP7.3 change unix:/var/run/php5-fpm.sock --> unix:/var/run/php/php7.3-fpm.sock
server {
    listen 80 default_server;
    listen [::]:80 default_server;

    root /var/www/html;
    index index.php index.html index.htm index.nginx-debian.html;

    server_name your_server_ip;

    location / {
        try_files $uri $uri/ =404;
    }

    location ~ \.php$ {
        include snippets/fastcgi-php.conf;
        fastcgi_pass unix:/var/run/php5-fpm.sock;
    }

    location ~ /\.ht {
        deny all;
    }
}
PHP Configure (Old)
server {
    listen 80 default_server;
    listen [::]:80 default_server ipv6only=on;

    root /usr/share/nginx/html;
    index index.php index.html index.htm;

    server_name server_domain_name_or_IP;

    location / {
        try_files $uri $uri/ =404;
    }

    error_page 404 /404.html;
    error_page 500 502 503 504 /50x.html;
    location = /50x.html {
        root /usr/share/nginx/html;
    }

    location ~ \.php$ {
        try_files $uri =404;
        fastcgi_split_path_info ^(.+\.php)(/.+)$;
        fastcgi_pass unix:/var/run/php5-fpm.sock;
        fastcgi_index index.php;
        fastcgi_param SCRIPT_FILENAME $document_root$fastcgi_script_name;
        include fastcgi_params;
    }
}
Let's copy the follow code into the default to enable php, compare to the code at Nginx on pcduino, it's php-enabled, you can read it on this part "location ~ \.php$".
server {
        listen   80; ## listen for ipv4; this line is default and implied
        listen   [::]:80 default ipv6only=on; ## listen for ipv6

        root /usr/share/nginx/www;
        index index.php index.html index.htm;

        # Make site accessible from http://localhost/
        server_name _;

        location / {
                # First attempt to serve request as file, then
                # as directory, then fall back to index.html
                try_files $uri $uri/ /index.html;
                # Uncomment to enable naxsi on this location
                # include /etc/nginx/naxsi.rules
        }

        location /doc/ {
                alias /usr/share/doc/;
                autoindex on;
                allow 127.0.0.1;
                deny all;
        }

        # Only for nginx-naxsi : process denied requests
        #location /RequestDenied {
                # For example, return an error code
                #return 418;
        #}

        #error_page 404 /404.html;

        # redirect server error pages to the static page /50x.html
        #
        error_page 500 502 503 504 /50x.html;
        location = /50x.html {
                root /usr/share/nginx/www;
        }

        # pass the PHP scripts to FastCGI server listening on 127.0.0.1:9000
        #
        location ~ \.php$ {
                try_files $uri =404;
                fastcgi_split_path_info ^(.+\.php)(/.+)$;
                fastcgi_pass 127.0.0.1:9000;
                fastcgi_index index.php;
                include fastcgi_params;
        }

        # deny access to .htaccess files, if Apache's document root
        # concurs with nginx's one
        #
        location ~ /\.ht {
                deny all;
        }
}
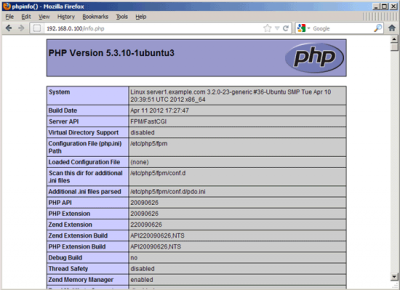
And now when we navigate to 127.0.0.1/index.php (or info.php), we will see the info like below:

Configuration
We're going to start moving about in Linux now. Remember that Linux still has a folder structure - just like any graphical operating system. If you want to learn more about the folder structure of a Linux system - there are some great tutorials and images that can be found through a quick Google search.
Let's move to where nginx stores the sites which it hosts, by using the command:
cd /etc/nginx/sites-enabled
or try at /etc/nginx/sites-available
And let's edit the file "default", delete everything in it, and copy the following code into it, you can do this with editor like nano or GUI editor:
server {
listen 80; ## listen for ipv4; this line is default and implied
#listen [::]:80 default_server ipv6only=on; ## listen for ipv6

root /usr/share/www/example;
index index.php index.html index.htm;

location / {
error_page 404 = 404.html;
}

# Make site accessible from http://localhost/
server_name example.com *.example.com;

location /doc/ {
alias /usr/share/doc/;
autoindex on;
allow 127.0.0.1;
allow ::1;
deny all;
}
}
Build the website
Now, we're actually going to make a little website in the /usr/share/nginx/www/example folder we made earlier.
Let's move to the folder by using the command:
cd /usr/share/nginx/www/example
We're going to make two files - an index page (homepage), and a 404 page (a page to display if the page a user is trying to access doesn't exist).
Let's first make the index page by using the command:
pico index.html
If you're familiar with html, at this point type in whatever you want. If you're not, then paste in the following, save and exit (as you did earlier with the nginx configuration file):
<html>
Hello world, this is my first website!
</html>
Next, do the same for the 404 page by using the command:
pico 404.html
Paste in the following if unsure:
<html>
Sorry, the page you are looking for doesn't exist!
</html>
The final step is to make sure that our pages are readable for others by changing the permissions on the files. If we didn't change the permissions, someone accessing your website may be given the 'You are not allowed to view this page' (or equivalent) error generated by nginx.
Use the command:
chmod -R 775 /usr/share/nginx/www/example
Detailed Configuring nginx
The nginx configuration is in /etc/nginx/nginx.conf which we open now:
vi /etc/nginx/nginx.conf
The configuration is easy to understand (you can learn more about it here: http://wiki.nginx.org/NginxFullExample and here: http://wiki.nginx.org/NginxFullExample2)
First (this is optional) adjust the number of worker processes and set the keepalive_timeout to a reasonable value:
[...]
worker_processes  4;
[...]
    keepalive_timeout   2;
[...]
Advanced
- basedir
#防跨站设置
fastcgi_param PHP_ADMIN_VALUE "open_basedir=$document_root/:/data/tmp/php/upload/:/proc/:/";
- rewrite root to /k, add line in location / { }
#return 301 /k;
Docker
- Install php extension tool: https://blog.csdn.net/qw_xingzhe/article/details/80179094
- Create mutiple from: https://segmentfault.com/a/1190000016137548
- Then create the targe
- Reference default library - https://github.com/docker-library/php