WY7688
WY7688
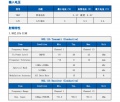
- Suppor 3.3V or 5V power supply
Reference Schematic
WY Board
Specification
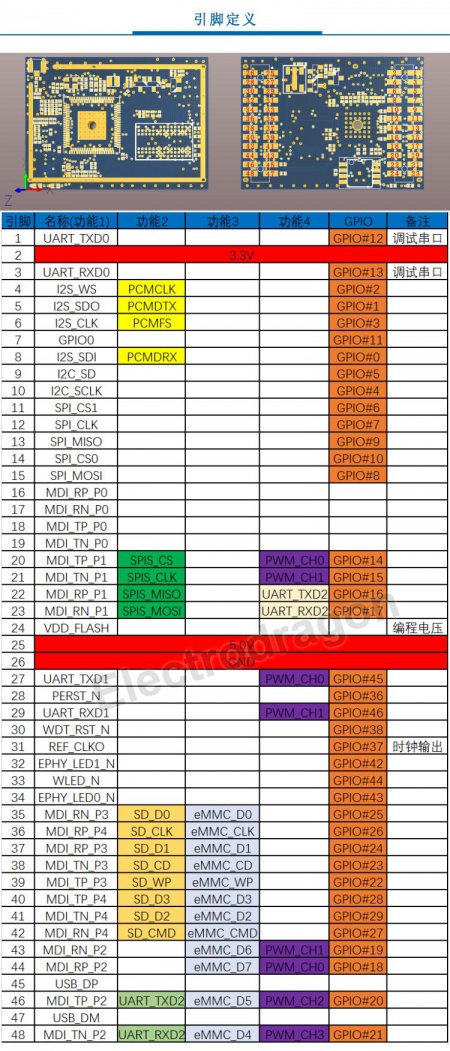
Pin Definition
- 调试串口 = debug serial port, 编程电压 =programe voltage, 时钟输出 = clock output
- Pin Function 1 Function 2 Function 3 Function 4
- 1 UART_TXD0 GPIO # 12
- 2 3.3V 3.3V power supply
- 3 UART_RXD0 GPIO # 13
- 4 I2S_WS I2C_SCLK GPIO # 2 PCMCLK
- 5 I2S_SDO I2C_SD GPIO # 1 PCMDTX
- 6 I2S_CLK I2C_SD GPIO # 3 PCMFS
- 7 GPIO0 GPIO # 11 REF_CLKO PERST_N
- 8 I2S_SDI I2C_SCLK GPIO # 0 PCMDRX
- 9 I2C_SD GPIO # 5
- 10 I2C_SCLK GPIO # 4
- 11 SPI_CS1 GPIO # 6 REF_CLKO
- 12 SPI_CLK GPO # 7
- 13 SPI_MISO GPIO # 9
- 14 SPI_CS0 GPIO # 10
- 15 SPI_MOSI GPIO # 8
- 16 MDI_RP_P0
- 17 MDI_RN_P0
- 18 MDI_TP_P0
- 19 MDI_TN_P0
- 20 MDI_TP_P1 SPIS_CS GPIO # 14 PWM_CH0
- 21 MDI_TN_P1 SPIS_CLK GPIO # 15 PWM_CH1
- 22 MDI_RP_P1 SPIS_MISO GPIO # 16 UART_TXD2
- 23 MDI_RN_P1 SPIS_MOSI GPIO # 17 UART_RXD2
- 24 VDD_FLASH Flash programming voltage
- 25 5.0V 5.0V power supply
- 26 GND power ground
- 27 UART_TXD1 GPIO # 45
- 28 PERST_N GPIO # 36
- 29 UART_RXD1 GPIO # 46
- 30 WDT_RST_N GPO # 37
- 31 REF_CLKO GPIO # 38
- 32 EPH_LED1_N GPIO # 33
- 33 WLED_N GPIO # 35
- 34 EPH_LED0_N GPIO # 34
- 35 SD_D0 MDI_RN_P3 GPIO # 25
- 36 SD_CLK MDI_RP_P4 GPIO # 26
- 37 SD_D1 MDI_RP_P3 GPIO # 24
- 38 SD_CD MDI_TN_P3 GPIO # 23
- 39 SD_WP MDI_TP_P3 GPIO # 22
- 40 SD_D3 MDI_TP_P4 GPIO # 29
- 41 SD_D2 MDI_TN_P4 GPIO # 27
- 42 SD_CMD MDI_RN_P4 GPIO # 28
- 43 PWM_CH1 MDI_RN_P2 GPIO # 19
- 44 PWM_CH0 MDI_RP_P2 GPIO # 18
- 45 USB_DP
- 46 UART_TXD2 MDI_TP_P2 GPIO # 20 PWM_CH2
- 47 USB_DM
- 48 UART_RXD2 MDI_TN_P2 GPIO # 21 PWM_CH3
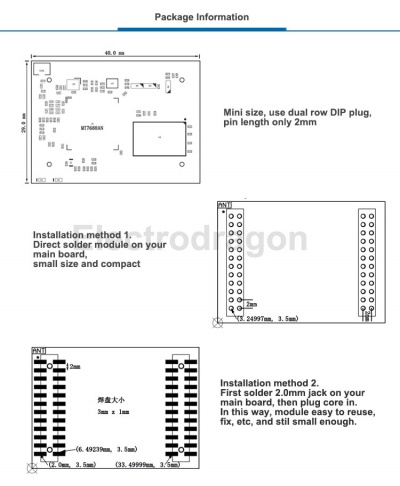
Stack Installation
Hardware Design Guide (Development Board)
- UART0 recommended for system debug only
- main board should not draw over 100mA from pin 3.3V
- SPI, IIS, UART1, UART2, PWM, USB, IIC can be added if need
- More information please read schematic of test board PDF in documents
- Play wav from TF card comman aplay -f cd -M ctl.wav
- IO test, press WPS button for more than two seconds, this will be detect by Uboot and run GPIO test demo code.
- Middle net port is WLAN, side is ethernet
Pin Confliction
- If use SD card, ethernet 3 and 4 can not be used.
- If use PWM, ethernet 2 can not be used.
Software
- Support MTK official linux 2.6.36SDK,OpenWrt 3.10SDK,eCos SDK
- Support OpenWrt official latest OpenWrt
- U-boot - system lead, like windows bios
- openwrt - system
- art - wifi tune-up file
File download
| Type | Original Link | Local Download | Note |
|---|---|---|---|
| Firmware - PandoraBox | MT7628AN_EVB |
| |
| Firmware - WY Testing Firmware | - | File:Wy-openwrt-mt7688an.zip | Support to test all on testing board resources. |
| Firmware - WY OpenWrt Firmware | SDK file (google drive link), 5PortEPHY.bin + dl.bin | Based on linux 3.18.45 core | |
| UBoot + source (RaLink UBoot 4.3 version) | - | .bin+source | UBoot |
| Uboot/sdk tool - cross-complier | - | cross-compiler | |
| MTK Official SDK | MediaTek_ApSoC_SDK? | SDK file (google drive link), File:MTK APSoC SDK User Manual.pdf | |
| MTK Official OpenWrt | ? | SDK file (google drive link), File:MTK-OpenWrt-3.10.14-SDK-Release-Notes.docx.zip | |
| Script - AP-Client | - | File:Ap-client script.zip |
Uboot Option
- Enter when in 2-5 into update mode, enter when more than 7 seconds into GPIO test mode
- Update mode also support serial port, or FTP mode
System backup
- Update or backup via SPI Flash programmer see on this page Memory
- Update U-Boot.bin file via programmer directly (address 00000000)
Update firmware via HTTP
- Connect net cable to WLAN, power cable, serial debugging cable
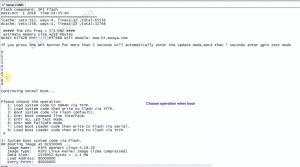
- Press WPS button between 2-5 seconds, serial debugging output info will show the board enter into update mode
- Set your PC which is connected via net cable to board, IP address next to board, for example, if board is 10.10.10.2, then PC should be 10.10.10.3
- Open 10.10.10.2 in browser and upload firmware, for example openwrt
Update firmware via TFTP
- Set PCB ethernet IP address 10.10.10.3, use tool(3cdaemon) to setup PC as FTP server, put files in D:\bin\
- Set U-boot to FTP upload mode, enter IP device/server address 10.10.10.3/10.10.10.2, and then enter file name
Compile U-Boot
- request cross-compiler
- copy compiler to /opt folder, tar xjvf
- copy and use U-boot file, check makefile, it needs complier in opt folder
- prepare to make -> make menuconfig, all configuration can keep default
- make (if get java error, install default-jre)
- finally will get uboot.bin file.
- If any failure on updating U-boot, need to use SPI-flash programmer
Compile Source Openwrt
- unzip openwrt, and unzip dl into openwrt folder
- basic, use make menuconfig, in configuration choose:
| Category | Setup | function |
|---|---|---|
| main | target -> Ralink RT288x/RT3xxx | chipset |
| main | subtarget -> MT7688 based boards | chipset |
| main | target profile -> Linkit7688 | chipset |
| network | network->SSH->openssh-server | SSH |
| network | network->SSH->openssh-sftp-server | SFTP |
| network | network->Ser2net | Serial2, set /etc/ser2net.conf, to listen on port 8002 and output on serial2 you can set like this: 8002:raw:0:/dev/ttyS0:115200 |
| UVC | see USB | page |
| sound card WM8960 | Kernel modules -> sound support -> *kmod-sound-core + *kmod-sound-mtk + *kmod-sound-soc-core | |
| sound card WM8960 | sound -> *madplay-alsa | |
| sound card WM8960 | Utilities -> *alsa-utils | |
| I2C support | Kernel modules -> I2S support -> *kmod-i2c-core + *kmod-i2c-ralink | Note to check if I2C turn on: i2c@900 { status = "okay"; }; |
- Compile other files into firmware: Make new folder in openwrt firmware folder -> mkdir files -> put files into files folder
- make V=99
- bin file in /bin/ramips/..
Command control GPIO
- Dev. board link0 link1 (ephy) corresponding to GPIO43 and42
- run command mt7688_pinmux get, information shows:
..
Groups ephy - [ephy] gpio
..
- now run command to set ephy to gpio - > mt7688_pinmux set ephy gpio
- export GPIO43, first
cd /sys/class/gpio
echo 43 > export
cd gpio43
- now directoy will be /sys/devices/10000000.palmbus/100006000.gpio/gpio/gpio43/
- ls will find
active_low device direction edge subsystem uevent value
- now to check gpio direciton -> cat direction, output in
- echo out, and check again, output out
- echo 1 >, or echo 0 >, value will be set
Other functions/modules
- To use USB camera, see on this page USB
Following I2S for WM8960 sound card
- Turn on I2S, change to
i2s {
    ralink,group = "i2s";
    ralink,function = "i2s";   // change gpio to i2s
};
- add ref_clk to provide clock for WM8960, in make file: build_dir/target-mipsel_24kec+dsp_uClibc-0.9.33.2/linux-ramips_mt7688/linux-3.18.45/sound/soc/mtk/Makefile
KBUILD_CFLAGS += -DCONFIG_SND_MT76XX_SOC
KBUILD_CFLAGS += -DCONFIG_I2S_WM8960
KBUILD_CFLAGS += -DCONFIG_I2S_IN_MCLK
#KBUILD_CFLAGS += -DCONFIG_I2S_MCLK_12P288MHZ
KBUILD_CFLAGS += -DCONFIG_I2S_MCLK_12MHZ
KBUILD_CFLAGS += -DCONFIG_GDMA_EVERYBODY
KBUILD_CFLAGS += -DSURFBOARDINT_DMA=15
- Test with following command to play
madplay  xxx.mp3
aplay  xxx.wav
Serial Port Usage
- Use mt7688 serial programming, for the serial port 1,2 need to turn off the soft flow control, the default is open, close the reference picture;
- Serial 2 can not use the problem: in the kernel directory arch / mips / ralink / mt7620.c inside the prom_soc_init function which add the following code:
u32 cfg; cfg = __raw_readl (sysc + 0x3c); cfg | = 0x0f; cfg | = 0x10; cfg | = 0x0f << 17; __raw_writel (cfg, sysc + 0x3c); Note: modify only use the network port 0, for the network port 1-4 can not be used.


