ESP8266 Open SDK
Breif
- esp8266 open source SDK
- Official github page: https://github.com/pfalcon/esp-open-sdk
Install in Debian/Linux/Lubuntu
- Folder instrucion, cd into /opt/ first
make app folder, for example nodemcu, git clone from github, should be /opt/nodemcu-firmware
git clone the esp-open-sdk folder, should be /opt/esp-open-sdk
- Install all tools
sudo apt-get install make unrar-free autoconf automake libtool gcc g++ gperf \
flex bison texinfo gawk ncurses-dev libexpat-dev python-dev python python-serial \
sed git unzip bash help2man wget bzip2
Install esp-open-sdk
- Clone
cd /opt
git clone --recursive https://github.com/pfalcon/esp-open-sdk.git
- Compile esp-open-sdk, to build the self-contained, standalone toolchain+SDK:
make STANDALONE=y
make
- This took 1-2 hours, and if sucessfully installed you will see
Xtensa toolchain is built, to use it:
export PATH=/opt/nodemcu/esp-open-sdk/xtensa-lx106-elf/bin:$PATH
Espressif ESP8266 SDK is installed, its libraries and headers are merged with the toolchain
Use toolchain
- First always run export line
export PATH=/opt/nodemcu/esp-open-sdk/xtensa-lx106-elf/bin:$PATH
- Try test with source code blinky example here
- Compile nodemcu code
cd /opt/nodemcu/nodemcu-firmware
make
- Brand new firmware bin file can be found in "bin" folder
Trouble shoot
Error: configure: error: could not find GNU libtool >= 1.5.26
- Need to install this: sudo apt-get install libtool-bin
You must NOT be root to run crosstool-NG
- add a none root user
user add esp
chown -R esp:esp /opt/nodemcu/
chmod u+rwx /opt/nodemcu/
Using with Vigrant
- Install it via vagrant, get the vagrant git package:
git clone https://github.com/adafruit/esp8266-micropython-vagrant.git
cd esp8266-micropython-vagrant
- provision vagrant box: vagrant up and vagrant ssh
Compile SDK
cd ~/esp-open-sdk
make STANDALONE=y
This will take 30-90 mins' to finish, actual time depends on your machine, not very necessary to do the following step, edit the Vagrantfile
# Bump the memory allocated to the VM up to 1 gigabyte as the compilation of
# the esp-open-sdk tools requires more memory to complete.
v.memory = 1024
and the compiling will be finished like this, SDK is installed now.
...
Xtensa toolchain is built, to use it:

export PATH=/home/vagrant/esp-open-sdk/xtensa-lx106-elf/bin:$PATH

Espressif ESP8266 SDK is installed, its libraries and headers are merged with the toolchain
Setup the Path of Bin of SDK
Run this command to update the .profile file that runs whenever you log into the virtual machine:
echo "PATH=$(pwd)/xtensa-lx106-elf/bin:\$PATH" >> ~/.profile
Logout and login again to process the update:
exit
vagrant ssh
and check the path is correct or not
echo $PATH
the result should be
/home/vagrant/esp-open-sdk/xtensa-lx106-elf/bin:/usr/local/sbin:/usr/local/bin:/usr/sbin:/usr/bin:/sbin:/bin:/usr/games:/usr/local/games
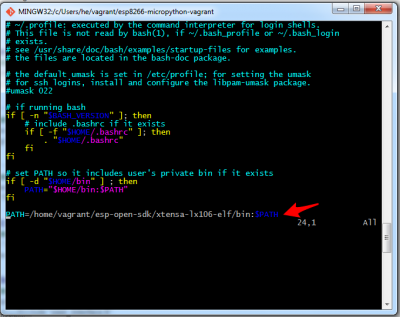
- You can also check the .profile directly by following command
vi ~/.profile
and the result should be like:
