Difference between revisions of "RPI Display"
| Line 1: | Line 1: | ||
- new wiki page: https://w2.electrodragon.com/board-series-dat/RPI-LCD/RPI-LCD-dat.md | |||
* More debug info please see [[RPI Debug]] | * More debug info please see [[RPI Debug]] | ||
== SPI GPIO LCD == | == SPI GPIO LCD == | ||
Latest revision as of 17:35, 29 February 2024
- new wiki page: https://w2.electrodragon.com/board-series-dat/RPI-LCD/RPI-LCD-dat.md
- More debug info please see RPI Debug
SPI GPIO LCD
1.8 SPI LCD
Alternative Method GPIO LCD
- Use latest system
- sudo nano /boot/config.txt -> add ->
dtparam=i2c_arm=on,spi=on
dtoverlay=pitft28-resistive, rotate=270 speed=48000000 fps=30
- Make debug monitor on screen -> sudo nano /boot/cmdline.txt before“rootwait” -> add -> fbcon=map:10 fbcon=font:VGA8x8
Enter into graphic system
- sudo nano ~/.profile -> add -> export FRAMEBUFFER=/dev/fb1
- raspi-config -> Enable Boot to Desktop/Scratch” -> ”Desktop log in as user ‘pi’ at the graphical desktop
Schematic
HDMI
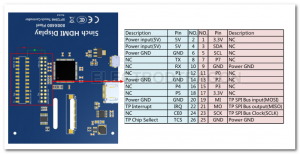
Vendor GoodDisplay
- Github - https://github.com/goodtft/LCD-show
- For latest RPI image, HDMI display work directly, you can choose install for touch function or not.
- Installation
for 5 -> sudo ./LCD5-show
- important, if display blink, make sure USB power is enough, otherwise attach usb power to display too
- make sure no other pins used touch screen GPIOs
Note
- change back to traditional LCD -> sudo ./LCD-hdmi
DPI - LCD
VGA
- Copy the file bin to system root folder File:Dt-blob-1.zip
- Edit config.txt file and add
enable_dpi_lcd=1
display_default_lcd=1
- Change DPI resolution by following commands, following is 1080p@60, more info please see http://elinux.org/RPi_Configuration at HDMI mode section
dpi_group=2
dpi_mode=82
- or 1366×768@60
dpi_group=2
dpi_mode=86
- If use 3B, please use latest raspbian system, and add following two times to turn off uart and bluetooth.
#disable the bluetooth only for pi3
dtparam=uart1=off
dtoverlay=pi3-disable-bt-overlay
Debug
- Also turn off SPI, IIC, Serial, 1-wire, remote IO in raspi-config in case
- Plug VGA before power up.
E-Paper
- Side pins for arduino, not soldered
- Freeze screen when lose power
- Very simple demo from arduino, not continue show..


