Category:Keypad
(Redirected from 4X4 Jtag Interface Keypad Module)
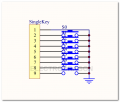
SCH
Membrane Switch Keypad
User guides
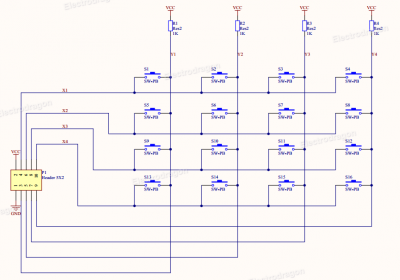
- This is a simple application of port manipulation using Arduino to paly with the 4*4 button pad. Before read the code, you'd better see the connection diagram first. We use four digital ports as HIGH voltage scanning the row of button pad and four analog ports to read the column of button pad connected with four pull-down resistors. If button is pressed,the voltage will be HIGH when it is scanned by HIGH voltage concurrently. Otherwise, the voltage is pulled down and will be LOW. Using eight ports totally, we can read 16 buttons.
Demo code
/* @file CustomKeypad.pde
|| @version 1.0
|| @author Alexander Brevig
|| @contact [email protected]
||
|| @description
|| | Demonstrates changing the keypad size and key values.
|| #
*/
#include <Keypad.h>

const byte ROWS = 4; //four rows
const byte COLS = 4; //four columns
//define the cymbols on the buttons of the keypads
char hexaKeys[ROWS][COLS] = {
  {'0','1','2','3'},
  {'4','5','6','7'},
  {'8','9','A','B'},
  {'C','D','E','F'}
};
byte rowPins[ROWS] = {7, 6, 5, 4}; //connect to the row pinouts of the keypad
byte colPins[COLS] = {11, 10, 9, 8}; //connect to the column pinouts of the keypad

//initialize an instance of class NewKeypad
Keypad customKeypad = Keypad( makeKeymap(hexaKeys), rowPins, colPins, ROWS, COLS);

void setup(){
  Serial.begin(9600);
}

void loop(){
  char customKey = customKeypad.getKey();

  if (customKey){
    Serial.println(customKey);
  }
}
Updated Demo Code 2013-05-24
We have tested with library on 4X4 keypad, but there is some thing need to change.Please follow the steps.
- Download this library, and it's refer to this arduino page.
- Use the example called "custom keypad" in the menu
- switched the pins, pin 1 connect to the keypad will make one row or one column not work out. so let's change all the wirings from 1-4 and 5-7 to 5-7 and 8-11.
- Always try to avoid pin 1, in other keypad version.
Mechanical 4x4 keypad
Schematic
Pin Definitions
VCC Row 1, 2, 3, 4
NC Column 1, 2, 3, 4
Output high TTL signal when either row or column buttons are pressed.
Demo code
- Same demo code for arduino can be found here.
#include<reg51.h>
#define uchar unsigned char
#define uint unsigned int
//sbit key1=P3^4;
//sbit key2=P3^5;
//sbit key3=P3^6;
//sbit key4=P3^7;
uchar code table[]={
0x3f,0x06,0x5b,0x4f,
0x66,0x6d,0x7d,0x07,
0x7f,0x6f,0x77,0x7c,
0x39,0x5e,0x79,0x71,
};
uchar num,temp;
void delay (uint z)
{
	uint x,y;
	for(x=z;x>0;x--)
		for(y=110;y>0;y--);
}
void main ()
{
	num=1;
	while(1)
	{
		P3=0xfe;// low TTL on first row
		temp=P3;//扫面P3口的数据,送给temp
		temp=temp&0xf0;//扫描是否有按键按下,如果有则temp的高四位肯定有一位是0.
		while(temp!=0xf0)
		{
			delay(5);//消抖
			temp=P3;//再次读P3口的数据
			temp=temp&0xf0;
			while(temp!=0xf0)
			{
				temp=P3;
				switch(temp)
			    {
				case 0xee: num=1;break;
				case 0xde: num=2;break;
				case 0xbe: num=3;break;
				case 0x7e: num=4;break;
				default: break;
			    }
				while(temp!=0xf0)
				{
					temp=P3;
					temp=temp&0xf0;
				}
			}
		}
	 	P1=table[num-1];


		P3=0xfd;//将第二行电平拉低
		temp=P3;//扫面P3口的数据,送给temp
		temp=temp&0xf0;//扫描是否有按键按下,如果有则temp的高四位肯定有一位是0.
		while(temp!=0xf0)
		{
			delay(5);//消抖
			temp=P3;//再次读P3口的数据
			temp=temp&0xf0;
			while(temp!=0xf0)
			{
				temp=P3;
				switch(temp)
			    {
				case 0xed: num=5;break;
				case 0xdd: num=6;break;
				case 0xbd: num=7;break;
				case 0x7d: num=8;break;
				default: break;
			    }
				while(temp!=0xf0)
					{
						temp=P3;
						temp=temp&0xf0;
					}
			}
		}
	 P1=table[num-1];


		P3=0xfb;//将第三行电平拉低
		temp=P3;//扫面P3口的数据,送给temp
		temp=temp&0xf0;//扫描是否有按键按下,如果有则temp的高四位肯定有一位是0.
		while(temp!=0xf0)
		{
			delay(5);//消抖
			temp=P3;//再次读P3口的数据
			temp=temp&0xf0;
			while(temp!=0xf0)
			{
				temp=P3;
				switch(temp)
			    {
				case 0xeb: num=9;break;
				case 0xdb: num=10;break;
				case 0xbb: num=11;break;
				case 0x7b: num=12;break;
				default: break;
			    }
				while(temp!=0xf0)
						{
							temp=P3;
							temp=temp&0xf0;
				         }
			}
		}
	 P1=table[num-1];


		P3=0xf7;//将第四行电平拉低
		temp=P3;//扫面P3口的数据,送给temp
		temp=temp&0xf0;//扫描是否有按键按下,如果有则temp的高四位肯定有一位是0.
		while(temp!=0xf0)
		{
			delay(5);//消抖
			temp=P3;//再次读P3口的数据
			temp=temp&0xf0;
			while(temp!=0xf0)
			{
				temp=P3;
				switch(temp)
			    {
				case 0xe7: num=13;break;
				case 0xd7: num=14;break;
				case 0xb7: num=15;break;
				case 0x77: num=16;break;
				default: break;
			    }
				while(temp!=0xf0)
						{
							temp=P3;
							temp=temp&0xf0;
				         }
			}
		}
	 P1=table[num-1];

	}
}


